Restarting the Request Manager Configuration Wizard
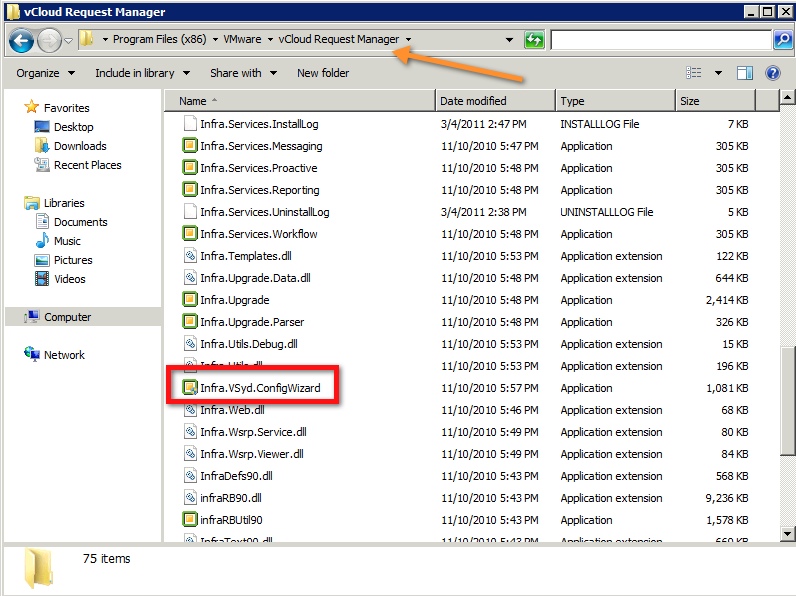
Once the installation is complete it will kick off the Configuration Wizard. I myself accidentally exited the wizard and could not figure out how to restart it. Luckily thanks to a colleague he pointed out the file that will restart it. This was a very useful find and tip as there is nothing intuitive in the start menu to help you restart the wizard short of uninstalling and re-installing, which I also did until I was shown this. The file is located in the install directory for vCloud Request Manager and once you find it you can restart the wizard from scratch. However if you use this AFTER you already did a full configuration…..it will drop all the database tables and basically perform a re-initialization of the database and the application. Useful if you want to revert back to a clean install.

Also it is worth noting at certain steps in the configuration the “back” button did not seem to actually allow me to go back and make a change. I am not sure if this was my VM or if other people have noticed this as well.
SSL Certificate Requirements
In my lab I had used the self signed 30 day expiring certificates. Not to mention my cells are also behind a load balancing appliance, (See Load Balancing Considerations for vCloud Director). This will stop you cold in your tracks if the certificates are different on each host, the certificates are not from a trusted CA, or they have expired. So based on my article about load balancing, I simply re-issued the self signed certificates with 365 day expiration to the FQDN used for the VIP on the load balancer. Then I was able to proceed with the configuration of vRM once I also added the self signed CA to the trusted authorities. Of course if you are using real certificates this should not be a problem, just make it known they need to be valid. Also the vCloud API location needs to be entered exactly as it is in the External URL section of the vCloud administrator screens if you are load balancing cells.
E-Mail Configuration
This was an interesting step for sure. vCloud Request Manager uses E-Mail as the primary means of approvals for requests that come into the system. Setting up the outgoing SMTP server is pretty basic especially if you have an internal SMTP server. For me it was a little more of a challenge as I use an external SMTP relay. Secondly the incoming mail must be either a POP or IMAP mailbox. This may be a challenge for you if you have IMAP or POP disabled on your mail server. Frankly I was able to get it all working with an external provider (GoDaddy), buy setting up a new mailbox on my hosted account. The authentication settings may need to be tweaked. This is one of the steps I actually skipped in the configuration wizard then used the vRM Management console to configure so I could make changes and test repeatedly.
Active Directory User’s “Manager” Configuration
vCloud Request Manager leverages the Manager field in AD to send requests and process approvals or denials. If you do not have a user’s manager configured the request will go to the overall system administrator you configured in the setup screens. In my lab I did actually create another AD account to assign to a user as the manager with a different email address and everything seemed to work without a problem. I think you can manually change these fields in Service Manager but they will be overwritten most likely when the AD connector updates the database.
Active Directory Connector Update Frequency
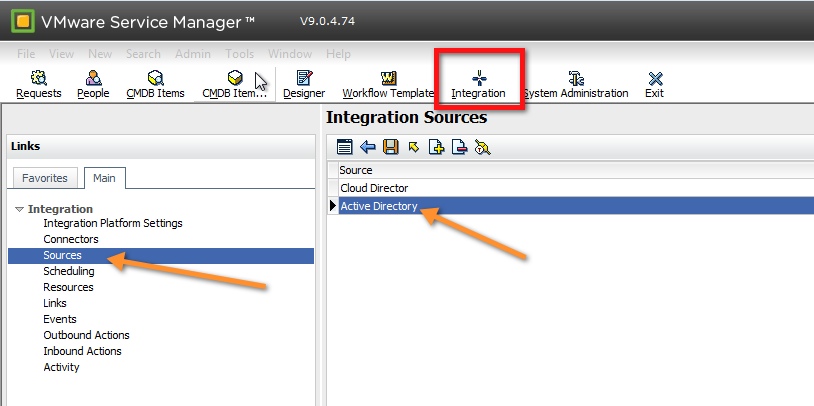
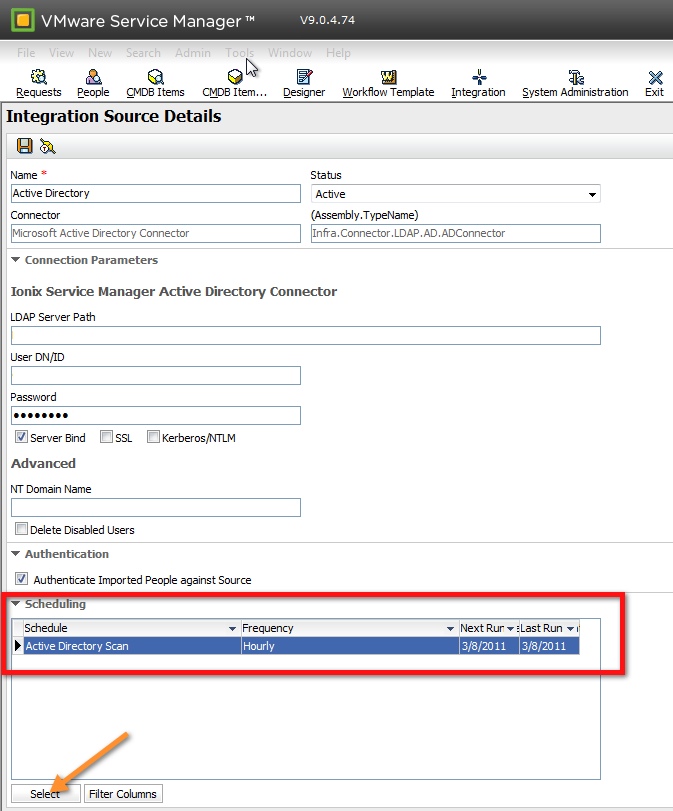
Out of the box the AD connector is setup to pull only once per day. For me in the lab this was not often enough especially since I was setting up users, e-mail addresses, managers, etc I needed these to show up sooner. You can actually change this in the vRM admin portal using “Integration” on the top menu then select “Sources” in the left pane, and finally “Active Directory” in the right pane. You can also make changes to the vCloud Connector Module here if you need to in the future.
Conclusions:
Essentially if you get the first couple pre-requisites setup properly, the remaining installation and configuration of vCloud Request Manager is pretty easy. Outside of the little gotchas with the SSL Certificates, E-Mail settings, User Managers, and possibly changing your AD update frequency you will be off and running with vRM. Once you have it up and running you can play with the basic functions by following the Administration Guide available on VMware.com. Also be sure to setup the vCloud user accounts that will have access to both vCloud Director and vCloud Request Manager.
 Chris Colotti's Blog Thoughts and Theories About…


