Configuring the vCloud Connector Nodes
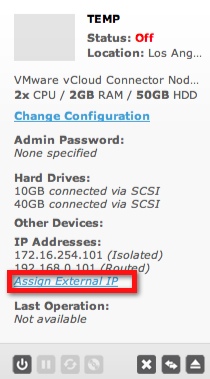
Once you have the vCloud Connector Server Nodes deployed you can get them each setup. I found doing these first was the easiest since you need them configured when you setup the server. When you deployed the local nodes you were asked to configure their IP addresses, but on the hosted one those were pre-assigned, however you will need to do one additional step before you can fully configure the remote nodes. Connect to Virtacore and be sure to “Assign Public IP Addresses” to your remote nodes. This is pretty easy just by selecting the configuration and going to the public IP page. You will need this IP address to configure the node for the basic settings. You will also need this address when you setup this node in the server settings.
Once you select the option you will be taken to another page to add the IP which is automatically assigned by an IP pool
Now that you have the remote node’s external IP addresses setup you can configure each Node. What I recommend configuring is the following items in the Node’s themselves. You can do this by opening a browser to http://[IP_Address_of_vCC_Node]:5480 and using the default credentials username of “admin” and password of “vmware”. For the remote nodes you may also want to generate an external DNS entry so you can create the SSL certificate to match properly.
- System/Timezone – Select your preferred timezone. Remember on hosted nodes you may want to change
- Network/Address – Change the hostname to match your DNS entry for certificate generation
- Update/Settings – Select automatically check for updates
- Node/General – Change the password
- Node/SSL – Generate real SSL certificates for your nodes
Once you have completed setup on all of your nodes we can set up the vCloud Connector server itself.
Configuring the vCloud Connector Server
As with the Node configuration point your browser to http://[IP_Address_of_vCC_Server]:5480 and login with the same default credentials. As with the nodes setup the following to begin with.
- System/Timezone – Select your preferred timezone. Remember on hosted nodes you may want to change
- Network/Address – Change the hostname to match your DNS entry for certificate generation
- Update/Settings – Select automatically check for updates
- Node/General – Change the password
- Node/SSL – Generate real SSL certificates for your nodes
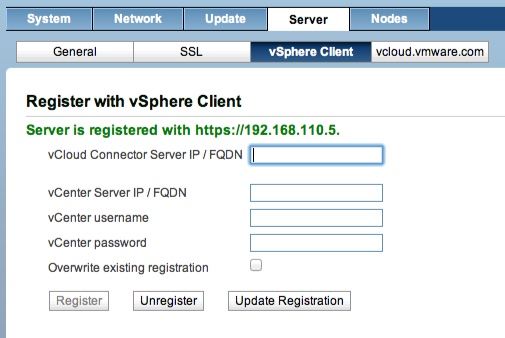
This is where the server differs from the Nodes, as you will also see under the server section an option for registration of the vSphere client as well as vcloud.vmware.com, however there is something to consider. Each vCloud Connector Server can only register with a single vCenter Server to access the client plugin. So if you have multiple vCenter Servers you need to decide which one to register it with. Remember this plugin is only to see the available clouds, but that is also the reason for the web portal. If you have to choose a vCenter Sever, I would recommend the vCenter where the vCloud Management components are located. The vCenter used by vCloud Director may be hardened, but rarely should users need to access that one as opposed to the first vCenter.
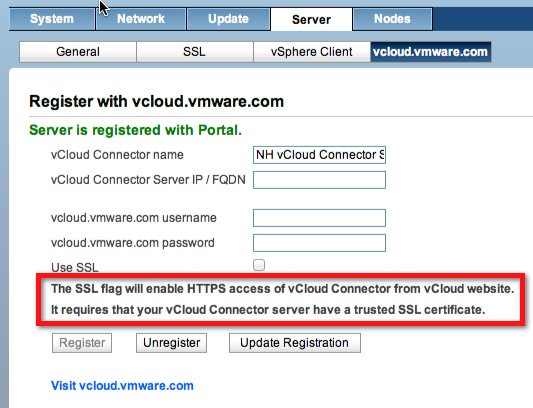
You must enter a vCenter Administrator here for the plugin to register, but once registered those credentials should no longer be used. Since this is for plugin registration only, you should not need a long-term service account. You can also update the registration, or un-register it completely. Now you can register with the portal as well.
NOTE: You must have a firewall rule with access on port 8443 for the portal to be able to connect properly. Also if you did NOT create valid SSL certificates do not check the SSL box. Look at the disclaimer that you need valid certificates for that to work. I did not read that the first time and could not get the portal to work even with the firewall rule for 8443 open.
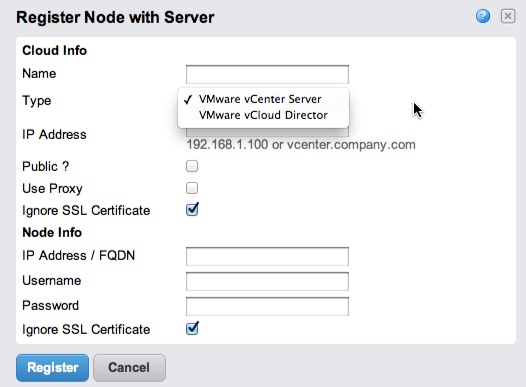
Finally you can configure the various Nodes for the server to communicate with. Here you will need the various API connection information depending on the cloud or vSphere vCenter server you are connecting to. You will need the login information you setup for each node as well for the connections to work. You can also see from below you have the option of connecting to both cloud and vCenter as well. If you used real certificates you can uncheck the box for “Ignore SSL”, but remember you would have to also have real certifications on vCloud Director and vCenter server to remove that option under cloud info.
Once configured you can see below the different connections, and be sure to note that the cloud URL’s need to include the Organization for the public providers. On a local private cloud, maybe you are using nodes per organization, but in my case I just used the system level connections. I have omitted my Virtacore organization ID but with them that would be a string of numbers you use. Also you can see they have two different API addresses for each cloud.
You can see by the list above that all nodes are connected and their status is “Up” which means we are ready to get them added to our portals.
 Chris Colotti's Blog Thoughts and Theories About…





Great post Chris. I started messing with vCC two weeks ago and got stuck trying to deploy the server and nodes inside the vCloud instance and not on the vCenter server directly. I heard that this setup process will be cleaned up in the next release to make getting this setup much easier. The whole notion of nodes and servers can be complicating. It would be nice if it was something as simple as the vCenter Mobile Appliance where I can deploy that OVF, open up the http page, then register local and remote vCloud IP/DNS addresses against it and get going.
Once I decided not to run them in the vcloud itself it seemed to make much more sense to me. Since the nodes are interacting with vCD I figured why should they be INSIDE vCD when they are hitting the API url on the outside.
Hence in an on premise setup I would just put all the nodes in the management cluster on the outside of vCD pointing to the vCD API’s. Of course in the hosted side you always need to run them inside the cloud, but there, that makes sense to me. 🙂 I may draw up a basic network diagram showing it, but it really does look like the first drawing in the post. I may do more of a network based logical view so it makes total sense how they are deployed in the lab.