

Introduction:
This outlines the configuration I personally used for installing setting up a lab based “vCloud in a box” for testing and understanding of all the vCloud components. This setup can be done almost 100% virtually with a single physical server hosting all the components. Parts of the configuration are unsupported by VMware for production as well as on certain platforms, however almost all of it works for training and testing purposes with limited hardware. Although this can be done on other platforms the storage and servers used here were IOMEGA and DELL. The Switch was Netgear GS742TR routing switche although many others at least support VLAN tagging just not routing functions. I assume the reader has knowledge and expertise already with setting up switches, VLANs, routing, as well as vSphere. If you do not require full routing functions portions of this can be changed as needed. The components and configurations listed here are what I used to build my implementation, but you can use some of the information to adapt to your needs. I will have to assume knowledge exists to create the VLAN’s, setup routing as well as other network items. If that needs to be detailed I can always update this post later.
Server Hardware Used:
- Dell T310 or similar
- 1 Socket Quad Core Processor (More are optional)
- At least 20GB of RAM
- Four internal Hard Drives RAID1 Pairs for many of the Management VM’s
- DRAC
- Two Gigabit NIC connections
Networking Hardware Used:
- GS724TR Gigabit Routing Switch
- Cisco RV042 Internet Gateway
- VLAN routing configured between only a few VLAN’s listed below
Storage Hardware Used:
- EMC ix-400d 4TB storage (Supports NFS and iSCSI and is VMware Certified)
- Local VMFS on the Physical Host
- Network based storage (NFS)
- iSCSI VMFS Volumes
Software Used:
- Windows 2008 x64
- CentOS (Unsupported for vCD)
- VMware vSphere vCenter
- VMware vSphere ESXi 4.1
- VMware vCloud Director 1.0 (includes VMware vShield Edge)
- VMware vShield Manager 4.1 (Virtual Appliance)
- VMware vCenter Chargeback 1.5
- VMware vCenter Management Appliance 4.1 (Virtual Appliance and Optional to Manage ESXi from command line
- Check out the Service Accounts post as well
Port Group VLAN’s Used:
- 100 – Primary “Production” Network
- 110 – Servers
- 120 – ESX Direct NAS Access
- 130 – ESX VMotion
- 140 – ESX FT
- 150 – Guest Internet Only
- 160 – View Desktops
- 170 – Load Balanced Network
- 180 – vCloud Internal Routable Network (Used inside vCloud)
- 4095 – Custom VMware VLAN for passthrough of all VLAN’s
Visio Diagram (Newly Added):

Storage Configuration of ix-400D:
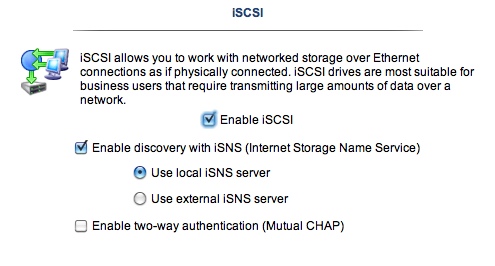
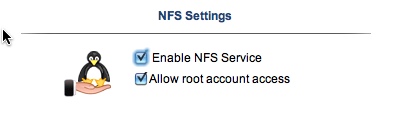
The ix-400D has dual network adapters which make it well suited to dedicate one of them to your “Production” home network and the other to the ESX Lab “NAS” network. From above we can see that one is VLAN 100 and the other is VLAN 120. Therefore we simply tag the physical ports in the switch and assign each port an IP address on the appropriate VLAN. You also need to enable iSCSI on the NAS as well as configure root access for NFS connections to work from ESXi. Once this is complete you will be able to add the VMKernel port for NAS/iSCSI access over the dedicated layer 2 link. I also chose not to enable CHAP and authentication since this setup is all private and separated. I chose to create a 250GB iSCSI volume as well as a NAS file share. The NAS share will require IP addresses of the VMkernel ports added to the security list.
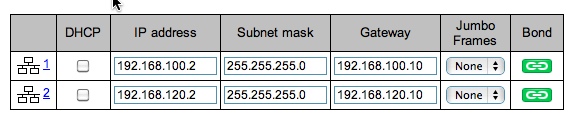
Note: Port #1 is VLAN 100 and Port #2 is VLAN 120 for ESX NAS Access
Physical Host Networking Setup:
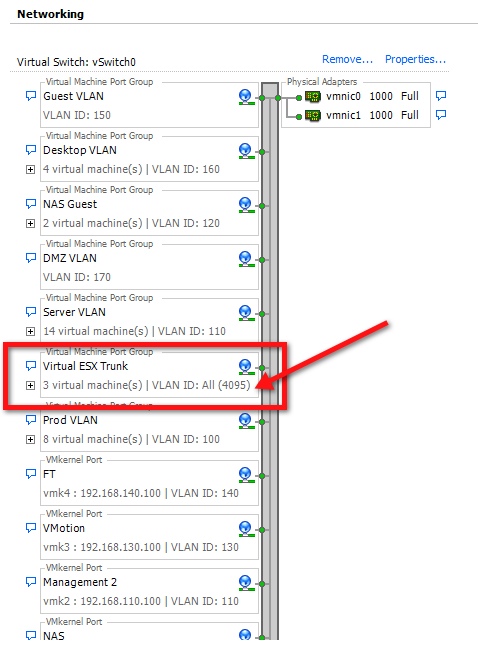
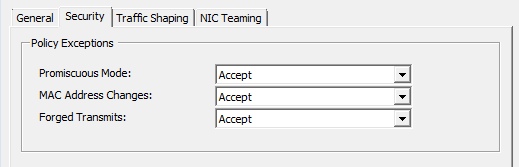
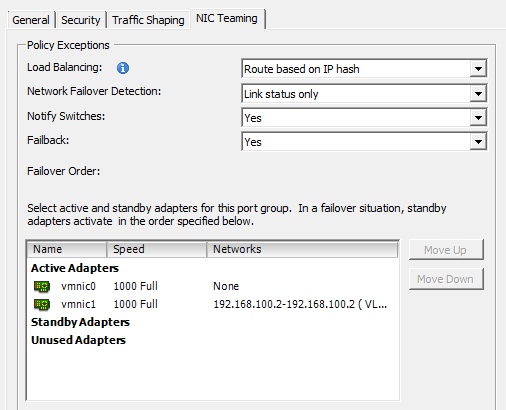
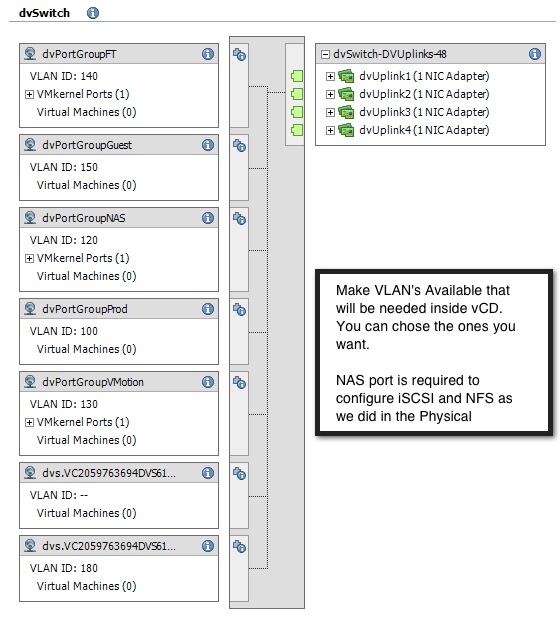
The physical host was installed with ESXi 4.1 with basic vSwitch networking initially. I elected to configure both physical NIC’s as a LAG’s to simply the physical connectivity due to all of the virtual networking. Below you can see the port groups configured and highlighted is VLAN 4095. This is a key VLAN becuase the “Virtual” ESX VM’s will use this to see all the same VLAN’s as the physical to fully mimic a true VLAN network configuration. If you don’t do this you will have to add multiple NIC’s to each Virtual ESX server to access the port groups. This gets a little confusing so after playing with it I decided to go the 4095 route which works perfectly. Also pictures is the vSwitch security settings. for all the follow on nested ESX virtual machines to work and boot up nested VM’s on them as well as access the networks. This is a key limitation that makes this not well suited for production networks.

Physical Host Storage Setup:
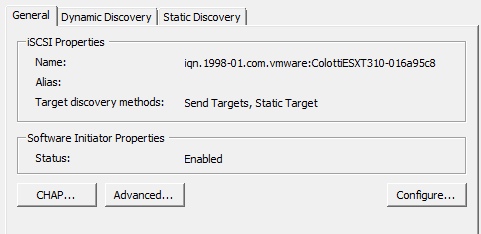
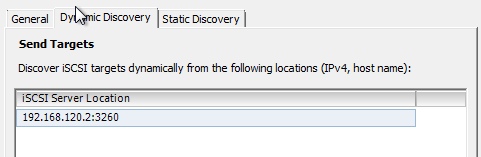
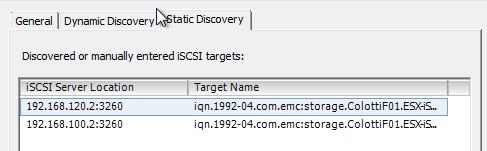
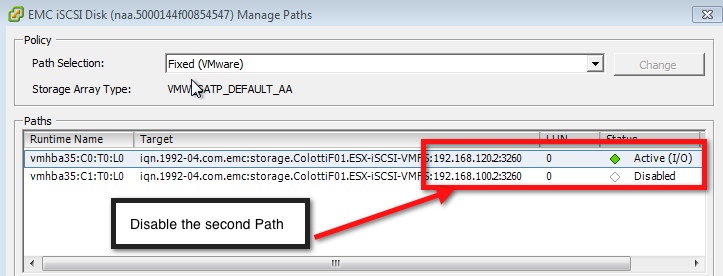
Now that we have the storage device configured and ESXi installed and the networking all configured we need to add the NAS storage to the physical host so we can use it for various items. We will also mount this networked storage within the nested ESX virtual machines when we get there. Configure a simple iSCSI software initiator to connect to the iSCSI storage. However if you use the dynamic discovery ESX will find the iSCSI avaialble on BOTH the 100 and 120 VLAN so you will need to take one extra step to force iSCSI over the 120 VLAN. The following screens will show these configurations. Be sure to also add the NFS mount point, and for the Iomega device the path for NFS is /nfs/.


Setting Up The Virtual Machines to host vCloud Components:
Now that we have the all the parts of the ESX host we can get into some of the actual vCloud director requirements. First and foremost is the need to setup all the windows machines to host the basic vSphere requirements. We can do this by creating in initial Windows 2008 R2 x 64 template. From there we need the following Virtual Machines configured. I elected to use completely separate Virtual Machines for all these roles
- Domain Controller/DNS Server (VLAN 110)
- SQL 2008 (VLAN 110)
- vCenter Server (VLAN 110)
Once these machines are configured, we can move onto the required virtual machines for the VMware vCloud Director components. I don’t see the need to fully detail the install and configuration of vCenter, AD, and SQL. The Virtual Machines required for vCloud Director are the following. All of these should have IP addresses on VLAN 110 to maintain isolation of the machines from your other networks. If you chose to create VLAN routes in the core switch that will provide you access to these devices. Otherwise this will result in all of these being isolated. In my case I do have a VLAN route from the Production 100 VLAN to the 110 VLAN only for terminal services, SSH, and remote console access.
- VMware vShield Manager (Virtual Appliance downloaded from VMware)
- CentOS Virtual Machine for Oracle
- CentOS Virtual Machine for vCD Cell Service
- Windows 2008 R2 x64 Virtual Machine for Chargeback 1.5
- Two Virtual Machines to run ESXi as Nested Virtual Machines.
I will not go over the installation of vCD or it’s components because those are available in the VMware vCloud Director Documentation on the VMware website. I will go into a few key configurations of the Virtual ESXi servers as there is a few quirks to be aware of.
Setting Up The Virtual Machines to host vCloud Components:
ESXi 4.1 by default does not support a Guest Operating system OF ESX, so in order to make that work we need to create a special .VMX file to support the installation of an ESXi virtual machine. Below are the steps to create the correctly configured virtual machiens to run ESXi. Generally these steps are outlined on other sites but this is the minimum needed to not only install ESXi, but to actuall allow a NESTED virtual machine to run on them. These two ESX hosts will become the vCD “Compute” cluster that you will point vCD to for resources.
Step #1:
- Initially use “Linux Other 64-Bit” as the Guest OS type
- 2 vCPU and 3GB or RAM each
- 20GB Virtual Disk (Thin Disk)
- 6 Network Adapters all on VLAN 4095 (Virtual ESX Trunk) port group originally configured
- Install ESXi into the Guest VM
- Configure the management network on VLAN 110 (Same as all the
- Configure the root password
- Confirm connectivity
- If Promiscuous mode was not set on vSwitch) of the PHYSICAL host this may not work properly
- Edit the VMX file to support booting Virtual Machines on these Virtual ESX hosts
- Shut down the VM and remove from inventory
- Connect to the Physical ESX host to edit the .vmx file of each Virtual ESX host
- Edit the following two lines to read as the following however you CANNOT power up a 64-bit Guest only 32-bit Guests:
- guestOS = “vmkernel”
- guestOSAltName = “VMware ESX 4.1”
- Re-register the Virtual ESX VMs
- Start up the Virtual ESX hosts
Step #2:
- Add the host names to the AD DNS server as A-Records
- Create a new Datacenter in vCenter for vCloud
- Create a new Cluster
- Add the two Virtual ESX hosts to the cluster
Step #3:
- Make sure VMNIC0 and VMNIC1 are on vSwitch0
- The other four will be used on a Distributed Virtual Switch shown below.
- All the NICs should be on the “Virtual ESX Trunk” Port group
- Only configure “Management” on vSwitch0
Summary:
Although this article has not detailed the individual configurations of ALL the components the purpose here was to detail out the single server solution to run VMware vCloud Director in your home lab. Once you have these components you can expand on your configuration as you see fit. To date I have also added the following:
- 2nd Domain Controller/DNS
- 2nd vCD Cell for load balancing
- Zeus Load Balancer Virtual Appliance (Desktop Version)
- VMware VMA Appliance
- VMware View for remote access
- IMPORTANT NOTE: Nested VM’s CAN be powered on inside the vCloud Compute cluster but they MUST be 32-bit Operating systems
Although this article has not detailed the individual configurations of ALL the components the purpose here was to detail out the single server solution to run VMware vCloud Director in your home lab. Once you have these components you can expand on your configuration as
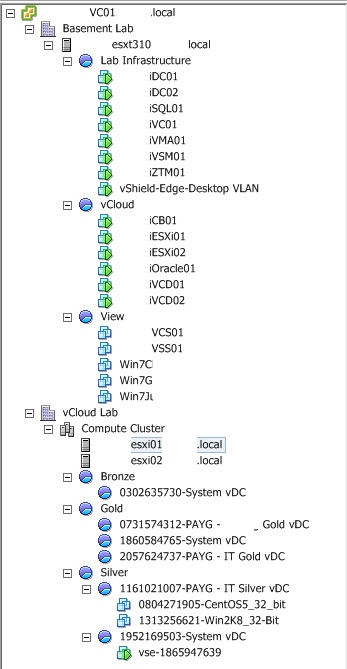
Below is a screen shot of all the Virtual Machines running on my single Dell Server. Although not are currently powered up they usually are. I’d say this is a testament to ESXi 4.1 running on a single server with all this going on.
I hope you have found this useful to setup your own home lab for VMware vCloud Director. Please provide some suggestions for ways to improve this article. I’d be happy to edit and add to it as feedback comes in. The nice part about doing all this virtuall is as you want to update and change things you can make use of Snapshots or Templates to quickly deploy new components or update the ones you have.