


So this weekend I set out to document and understand the new aspects of vCloud Connector 1.5 and how some of the components go together. It seemed like there might be some interest in a how to article explaining the process not only of putting the pieces together, but also how to actually do some of the moving of workloads. So I set out on a mission to see if I can explain some of this in detail. The first thing anyone will need to do in order to truly try out vCloud Connector is to get some public cloud space on a provider that is using vCloud Director. My choice was Virtacore for a number of reasons, but they were open to letting me try out their beta portal and provide some initial feedback. If you do happen to sign up with them you can actually get $50 off of your initial public cloud service by using the code STEKREF when you sign up, so not a bad deal if you have not tried out a vCloud Express provider yet.
vCloud Connector 1.5 Architecture
First I think it is important to understand the new architecture of vCloud Connector 1.5 as it differs greatly from 1.0. Many who have played with both will see the differences out of the gate, but I wanted to also tie this to how I deployed the various components for testing. Refer to the figure below which was taken from the vCloud Connector user guide.
vCloud Connector Server – The server component is the control and management point for vCloud Connector. You really only need one server as long as it can connect to the various nodes. In my case the server was hosted in my lab, on the management cluster for vCloud Director. I did not host it inside my vCloud as a vapp simply because I did not see the need to. I decided to treat it like any other management server workload supporting the vCloud Eco-System
vCloud Connector Node – The “nodes” are the 1:1 connection points managed by the server. The 1:1 aspect is that you actually need a node per cloud, Organization, or vSphere instance you want to move workloads between. So in my case I needed two nodes on premise and two nodes hosted at Virtacore. These remote nodes were of course hosted in the cloud. I needed two of them because their public cloud is made up of two datacenters, each with their own vCloud installation and thus two different API’s. The nodes are also where the various exports happen during the process of the move and where you may need to increase the disk sizes, or mount them to NFS if you can. In my case I connected all the nodes to either the SYSTEM level or the top-level of vSphere for testing. In a hosted public cloud, you could need more nodes depending on the number or organizations you have as well as the number of datacenters.
vCloud.VMware.com – This is the remote web portal you can use to manage your various vCloud Connector servers in a single pane of glass. There is some requirements to get connected to this which we will talk about in a little bit. UPDATED 12/7/11: I wanted to point out a couple things about the portal. Although the portal is internet based, it will direct your browser to the local address of the vCloud Connecter Server. This means you are not able to manage the vCloud Connector server unless you also have VPN or on premise access to it. The component could be hosted externally with an external IP, but as of today it also will not work behind NAT. Some folks have discovered this and there is a KB article about it. Just take note that even though you are accessing a public portal it will be sending your browser to the local IP addresses. This also means that a firewall rule for for “External” access is not needed until the NAT issue is worked out. Because of this reason you will not be able to make console connections to some Virtual Machines if the vCloud Director Console IP is not exposed and properly directed or load balanced.
Security – It is important to understand the security of these components. The Server and Nodes communicate over SSL using port 8443 regardless of where the nodes are located. So it stands to reason you will want to generate some real certificates at least for your vCloud Connector server since that will be connected to be the remote nodes as well as the portal. The local nodes may not be as big a concern since they are on the same network. However you can see below, that if you are transferring a workload from a private cloud to the public the two nodes will interface and then you have an argument for some real certificates on all nodes as well. Generally in a production deployment I would get all real certificates, but in my lab I decided not to just for the sake of testing.

What I ended up with was the following servers on my network once I decided on the deployment scenarios
- vCloud Connector Server – on the same local subnet as the other management virtual machines
- vCloud Connector Node – on the same subnet as other management components for vCloud Director Connection
- vCloud Connector Node – on the same subnet as other management components for vSphere Connection
- vCloud Connector Node – Remote on Virtacore in the Virginia Datacenter
- vCloud Connector Node – Remote on Virtacore in the Los Angeles Datacenter
Installing the Various Components
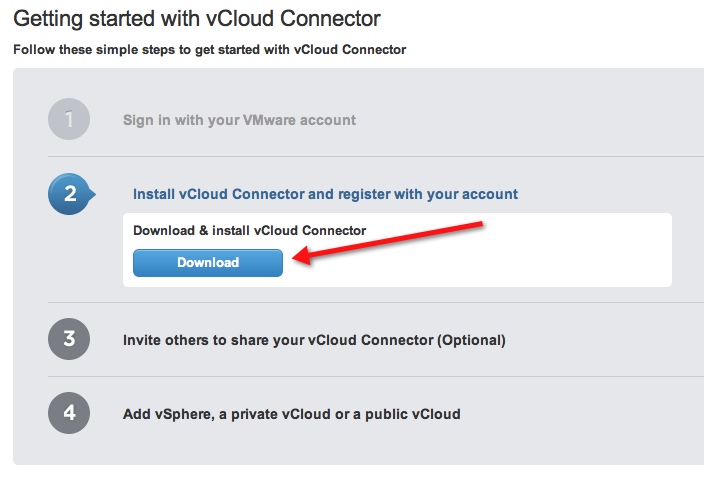
The first step you want to do is visit vcloud.vmware.com and register a username on the portal. Bear in mind that this is the first and primary username that will be used to connect the server to the portal. You can invite others to use the portal, but I would not suggest making the initial login your personal email. You may want to make it something more generic to the company like you may currently do for the support or licensing portal. In fact, if you already have a login that is a single company login you may be able to already use that since it is a valid vmware.com account.
Next you want to set up a public cloud testing account at Virtacore or other provider. Virtacore has already put the server and node components in their catalog for users to deploy into their host public cloud saving you the setup time on that side.
Once you are logged in the first thing you can do is download the appliances from the portal since that is the only option available.
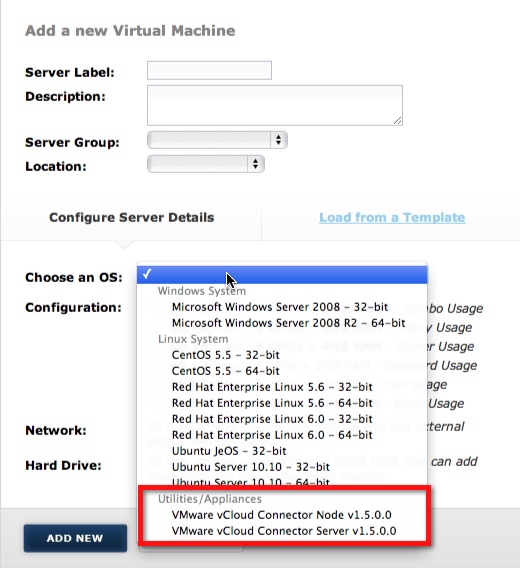
On the Virtacore side simply deploy a new node from the catalog using the portal as shown below. You will need to deploy one in LA and one in VA if you want to have access to each datacenter. Having these utility machines on the service provider side does save a lot of time and effort from having to upload them to my own catalog for sure.
You will also want to add some users to your hosted Virtacore cloud. The initial login they provide you cannot be used to connect using the nodes, and you will need to add other Organization Administrators to perform most of these functions.
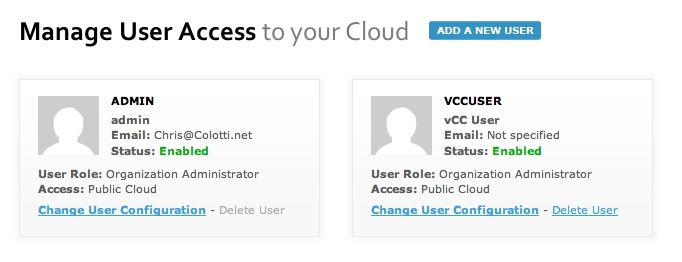
You will use these credentials later, but I found out this weekend you cannot use the original login since that is tied to their billing system as well. Simply go to administration and add a new user to assign them as an Organization Administrator
Configuring the vCloud Connector Nodes
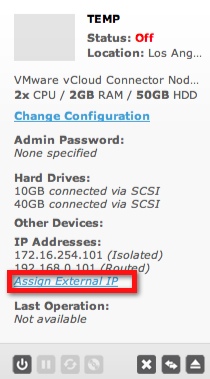
Once you have the vCloud Connector Server Nodes deployed you can get them each setup. I found doing these first was the easiest since you need them configured when you setup the server. When you deployed the local nodes you were asked to configure their IP addresses, but on the hosted one those were pre-assigned, however you will need to do one additional step before you can fully configure the remote nodes. Connect to Virtacore and be sure to “Assign Public IP Addresses” to your remote nodes. This is pretty easy just by selecting the configuration and going to the public IP page. You will need this IP address to configure the node for the basic settings. You will also need this address when you setup this node in the server settings.
Once you select the option you will be taken to another page to add the IP which is automatically assigned by an IP pool
Now that you have the remote node’s external IP addresses setup you can configure each Node. What I recommend configuring is the following items in the Node’s themselves. You can do this by opening a browser to http://[IP_Address_of_vCC_Node]:5480 and using the default credentials username of “admin” and password of “vmware”. For the remote nodes you may also want to generate an external DNS entry so you can create the SSL certificate to match properly.
- System/Timezone – Select your preferred timezone. Remember on hosted nodes you may want to change
- Network/Address – Change the hostname to match your DNS entry for certificate generation
- Update/Settings – Select automatically check for updates
- Node/General – Change the password
- Node/SSL – Generate real SSL certificates for your nodes
Once you have completed setup on all of your nodes we can set up the vCloud Connector server itself.
Configuring the vCloud Connector Server
As with the Node configuration point your browser to http://[IP_Address_of_vCC_Server]:5480 and login with the same default credentials. As with the nodes setup the following to begin with.
- System/Timezone – Select your preferred timezone. Remember on hosted nodes you may want to change
- Network/Address – Change the hostname to match your DNS entry for certificate generation
- Update/Settings – Select automatically check for updates
- Node/General – Change the password
- Node/SSL – Generate real SSL certificates for your nodes
This is where the server differs from the Nodes, as you will also see under the server section an option for registration of the vSphere client as well as vcloud.vmware.com, however there is something to consider. Each vCloud Connector Server can only register with a single vCenter Server to access the client plugin. So if you have multiple vCenter Servers you need to decide which one to register it with. Remember this plugin is only to see the available clouds, but that is also the reason for the web portal. If you have to choose a vCenter Sever, I would recommend the vCenter where the vCloud Management components are located. The vCenter used by vCloud Director may be hardened, but rarely should users need to access that one as opposed to the first vCenter.
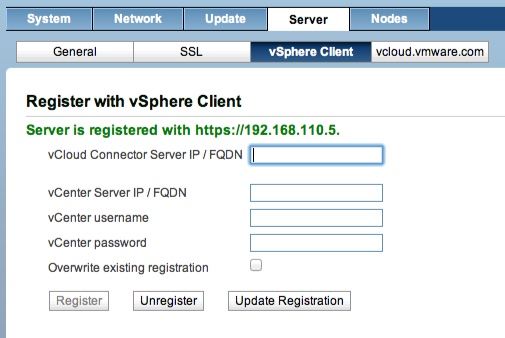
You must enter a vCenter Administrator here for the plugin to register, but once registered those credentials should no longer be used. Since this is for plugin registration only, you should not need a long-term service account. You can also update the registration, or un-register it completely. Now you can register with the portal as well.
NOTE: You must have a firewall rule with access on port 8443 for the portal to be able to connect properly. Also if you did NOT create valid SSL certificates do not check the SSL box. Look at the disclaimer that you need valid certificates for that to work. I did not read that the first time and could not get the portal to work even with the firewall rule for 8443 open.

Finally you can configure the various Nodes for the server to communicate with. Here you will need the various API connection information depending on the cloud or vSphere vCenter server you are connecting to. You will need the login information you setup for each node as well for the connections to work. You can also see from below you have the option of connecting to both cloud and vCenter as well. If you used real certificates you can uncheck the box for “Ignore SSL”, but remember you would have to also have real certifications on vCloud Director and vCenter server to remove that option under cloud info.
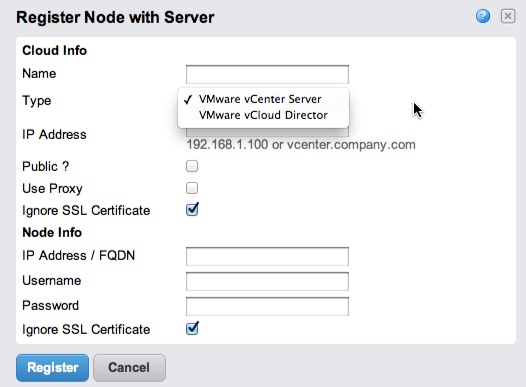
Once configured you can see below the different connections, and be sure to note that the cloud URL’s need to include the Organization for the public providers. On a local private cloud, maybe you are using nodes per organization, but in my case I just used the system level connections. I have omitted my Virtacore organization ID but with them that would be a string of numbers you use. Also you can see they have two different API addresses for each cloud.
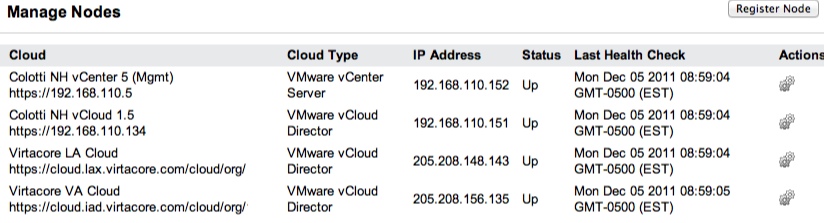
You can see by the list above that all nodes are connected and their status is “Up” which means we are ready to get them added to our portals.
Connecting To the Clouds
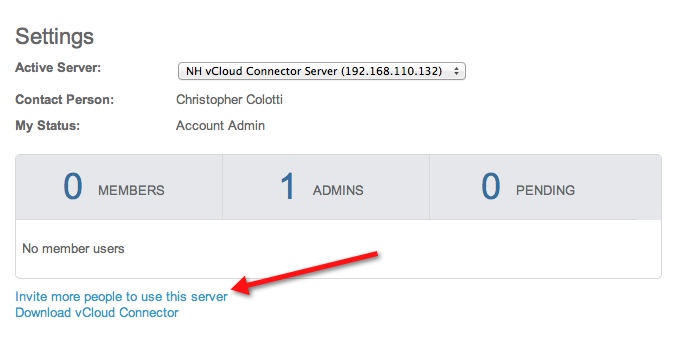
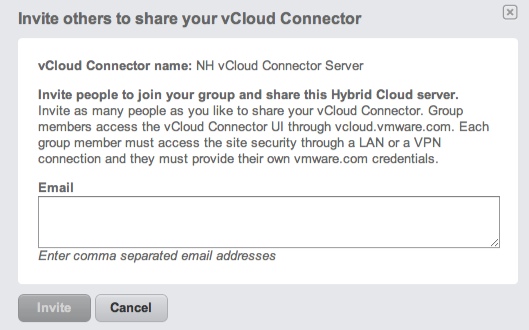
Now that all the nodes, and the server are fully configured for connectivity, we as individual users with access to the vCenter where the plugin was registered, or as the master admin to the portal can start to add our view into the various clouds. Remember that at this step the connections are contextual based on the user. So if I log into vCenter and add these 4 clouds, another user logged in will have to add them for their view. Same goes for the portal as well. Since vCenter is already tied to users and groups the first thing you may want to do from the master portal admin is “Invite Users” from the settings link in the upper right corner. You can see the link and the dialog screen as well where you can add other users. You can see by the note the users must have connectivity and a vmware.com login.

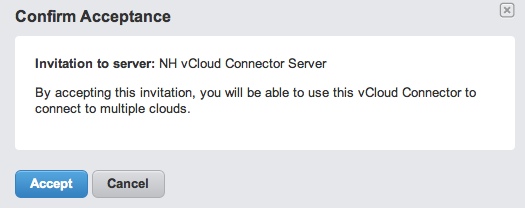
Once you have sent the invitations they will get an email where they can accept the invite. They will need to have their vmware.com credentials, but this is what they will see when they log in. They can accept, decline, or download their own versions of the appliances.
N ow that users have been invited, and by the way you may want to invite yourself to the portal since most likely you used the generic login to set it up. You do not want to use that to add a cloud, as if you log in again with your credentials you will need to do it all over again. From this point on adding a cloud int he portal OR through vCenter is the same thing since the nodes are pre-configured to connect to certain places. You will need the various credentials for the different clouds as well. From here I will use the portal interface to add the four different clouds so I can ultimatly move workloads.
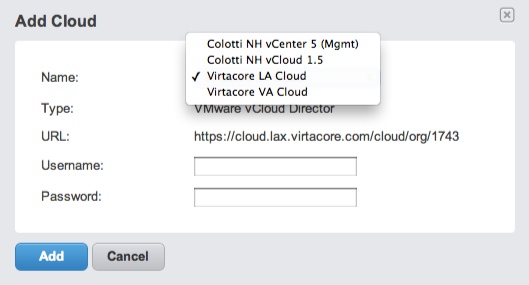
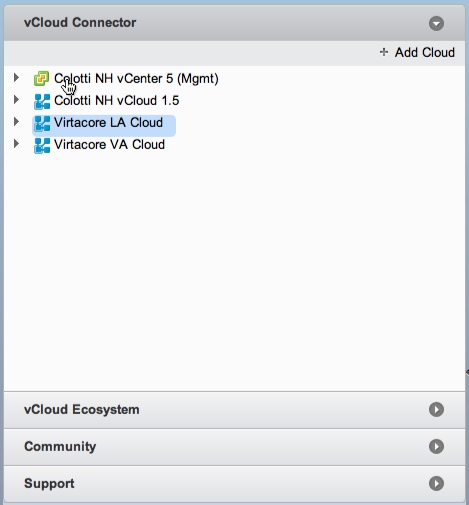
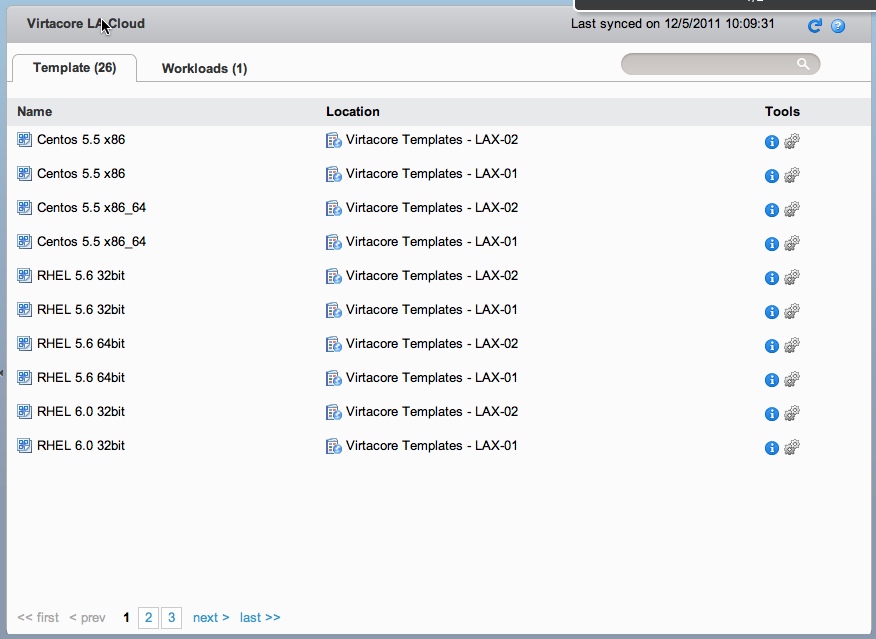
We are going to repeat this process four times to get all of the clouds added in. Remember these are the nodes that have been pre-configured to connect to certain API’s so if you find you made a mistake you will need to update those on the vCloud Connector Server’s node settings. Each one will use the various credentials for my user to connect. Once all four are connected you will see them in the left hand pane, and the templates and workloads in the right hand pane.
Once you know that all your connectivity is sound, we can investigate the process of moving workloads between clouds as well as vSphere. That will be done in Part 2 of this series so we can keep the content to a few pages per article. I know from doing this it has opened up my eyes on the requirements to really get vCloud Connector going not only in a private cloud, but also connected to a public cloud like Virtacore. If you have not actually tried the provider based clouds, now is a great time to with the ability to use vCloud Connector 1.5. Give my friends a Virtacore a try using their offering for vCloud Express and vCloud Connector 1.5 and I do not think you will have bad experience. I have also found they are very open to helping with any issues you may have and working to better their offering. Don’t forget to use the code STEKREF when you sign up for $50 off your initial public cloud offering with Virtacore. Stay tuned for Part 2 sometime later this week or next week.