


Since joining Tintri I have heard from folks that Site Recovery Manager was something that was “Difficult” to use. I have in the past stood it up many times and while the product itself does require a lot of thought (regardless of the storage platform). I am no SRM expert but I have always believed the product was very good at what it does as long as you have all the right rules and actions in place. There in lies the complexity of any Disaster Recovery solution. That being said, I was extremely surprised to see just how easy SRM was to set up with Tintri arrays and I wanted to share my “short” version of how to quickly configure it. There are some videos and tutorials out there you can also reference. I am going to assume if you are reading this you have some basic familiarity with Site Recovery Manager.
What Makes Tintri with SRM Unique?
First you have to remember at the core of it’s being, Tintri arrays were designed to operate with the virtual machine as the center of all things. The array has always been able to perform actions on a per virtual machine basis. So functions like replication in the Tintri world were not designed on the old premise of LUN and Volumes, but SRM was. Therefore, in order for it to work some basic steps have to be taken to make SRM think it is working with a standard replicated LUN. I think you see that this is quite easy to do and actually simplifies the entire architecture. To break it down to the simple steps from all the guides out there here is pretty much the things you need to do in order, assuming Site Recovery Manager is already installed and configured and your pair of Tintri arrays are also installed and configured running virtual machines.
- Install the Tintri SRA on each Site Recovery Manager Server
- Create a sub-mount directory on the Tintri array
- Using the sub mount, create a new vSphere Datastore
- Configure a Service Group from the Tintri array user interface for the new datastore
- Migrate or deploy new virtual machines to the new Datastore
- Create the SRM Array pair with the Tintri SRA
- Create the SRM Recovery Group
- Create a recovery plan including the new recovery group
Seriously, this is less than 10 steps to get virtual machines protected and under SRM control. What I will point out is that steps 2 and 3 are the key here. This sub-mount and datastore live on the same Tintri filesystem but this is how we let SRM think there is an actual replicated LUN. All the while any virtual machine you simply deploy and place there will start replicating based on the Service Group’s policy. There is nothing you need to really do except add machines to that Datastore. So let me show you what this looks like.
NOTE: prior to doing any of this you will need to have the Tintri replication license and replication end points configured as well.
Tintri SRM Sub-Mount Datastores and Service Groups
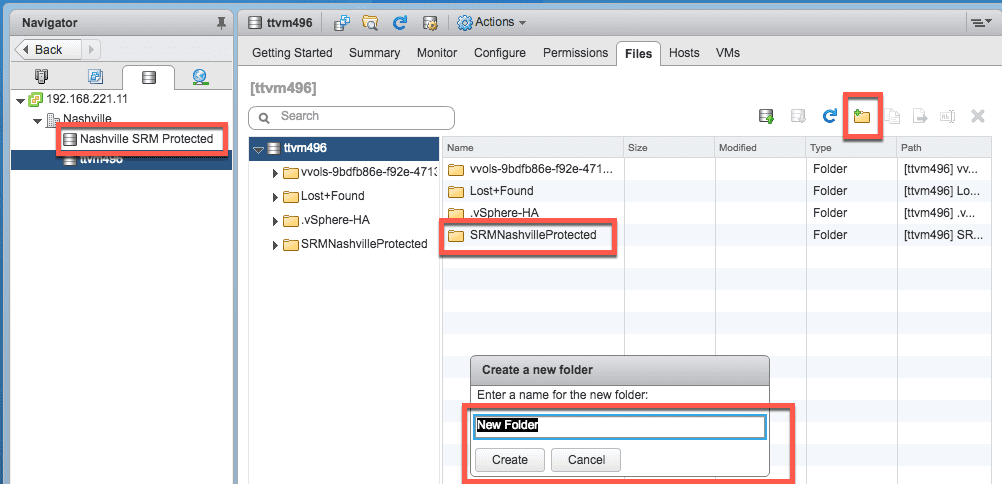
To create this you simply browse the main Tintri datastore and create a new folder. You can see below I created a sub-mount for the Nashville SRM Protected datastore to point to.
If you have multiple Tintri arrays you would do this on each one. Once you have at least one new datastore created you can go over to the Tintri UI to create the service group and it’s replication policy.
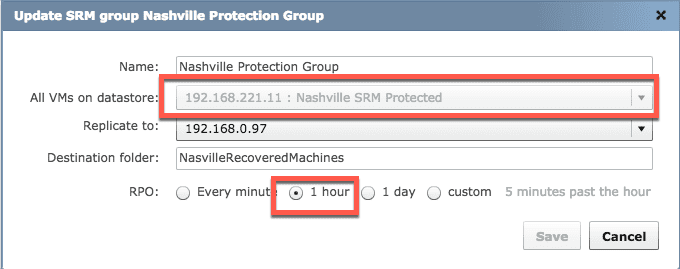
Here you can see that the new datastore is shown and the replication RPO of every hour will be applied to all virtual machines placed on this datastore. If you already configured this Tintri array replication configuration, those options will be shown under “Replicate To”. At this point you are pretty much done with the Tintri configuration and you can start moving machines to this datastore to start them replicating. I want to point out a few things:
- Currently SRM integration supports the Tintri Asynchronous replication down to 1 minute
- If you want virtual machines on different policies just repeat the process to create additional datastores and corresponding service groups
- Suggestion: Name the datastores by the applied policy or by protection tier
- You can configure cross replication the same for each site that is hosting production and replicating to a peer for cross DR purposes.
- IMPORTANT NOTE: When you name the “Destination Folder”, it is important to understand this is ONLY created when a failover is performed. It will be where the recovered virtual machines are placed. If you “Re-Protect” and fail back this folder will be created again. Essentially this name is used over and over as you fail back and forth and the datastore assigned to it. Each time you re-protected and fail back you will need to clean up the old version of this folder. This is by design and allows you to still have access to the previous copies.
Tintri SRA and Protection Groups
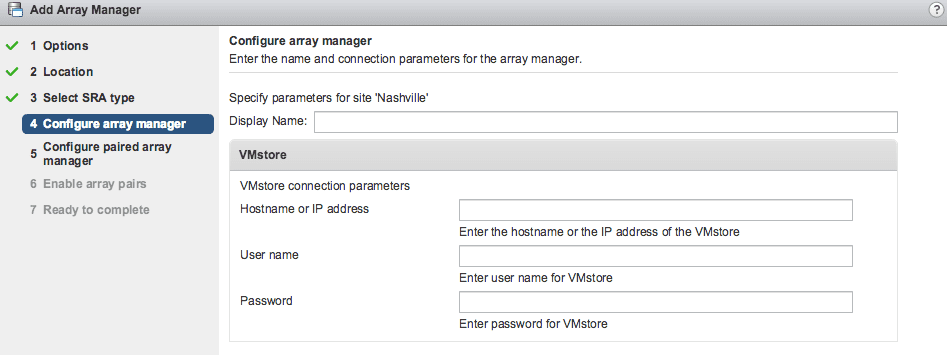
Once you have completed the simple steps above, you can move over to the Site Recovery Manager side to add the new array pairs and setup the Protection Groups. First proceed to Array Based Replication and add an array manager. Select add array manager and proceed through the wizard using the “Add Pair of Array Manager” option. You should see the Tintri SRA. If you do not simply re-scan each SRM server for new SRA installations first. The Tintri SRA will ask for the admin credentials for both site’s Tintri arrays.
HINT: Whenever Tintri is asking for login credentials you want to use the management IP address to hostname not the storage ports
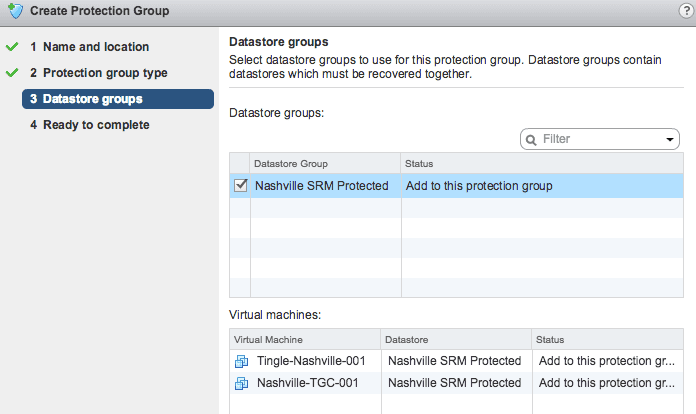
Finally you can enable the array pairs in the last screen. Once these are added the system will auto discover any replication service groups and you can easily create the SRM protection group. Just go to Protection groups and create a new one. In the case below I can create two because I have cross replication groups setup, so I would need to do this twice. Once for Nashville–> Seattle and vice-versa.
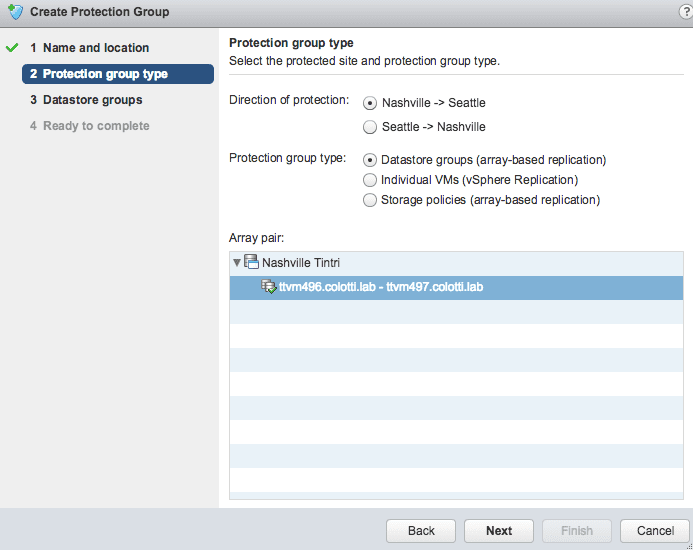
Lastly you will see the datastore group and any of the current virtual machines already residing there.
You can rinse and repeat this for other Tintri arrays you need to configure a protection group. Once the groups are created the system will begin to create the placeholder virtual machines. Finally you can start to create an SRM recovery plan as you normally would.
Tintri and SRM Summary
I hope you can see that adding Tintri into your Site Recovery Manager installation is extremely easy to do and you can get pretty flexible with the replication options. With just under 10 steps to complete you can be up and running with Tintri and SRM in your production or lab setup. I would encourage you to check out the link at the beginning for the full instructions. I may try to put together a video as well just to show the test, failover, re-protect, fail back process and how the datastores and folders are handled automatically. I actually helped a customer set this up yesterday on a WebEx in less than 30 minutes.