


![]()
It’s no surprise that so many people use PLEX these days. The one challenge I have had thus far is providing a decent server that my friends can access without the limitations of my upstream bandwidth. While PLEX Pass gets you a Plex Cloud server, to be honest, the implementation has been less that stellar since its release. I set out to build something myself on a Virtual Private Server (VPS) and decided to document the build after a couple tries that landed me on something that worked well. I decided to use Google Drive for my media library storage so once it all was uploaded initially and setup to sync twice daily from my master library on premises this build process could start. You really can’t start the VPS build until you get your media uploaded which is the longest part to wait for. I’ve done this so many times and had so many notes it was high time to consolidate them.
Ultimate Plex VPS Step 1: Choosing a Provider (UPDATED)
This is probably the worst part. There is literally hundreds of options out there. The problem is cost for what you get. I personally tried about 5-6 different ones and the real problem is finding one at a decent price that also includes Unlimited Bandwidth. The reason for this is when you connect to Google Drive your data will use double bandwidth for the pull from Google Drive and the push to the client, passing through the PLEX Server as a proxy.
NOTE: As of July I have since dropped the original provider. While they stated unmetered bandwidth they constantly traffic shaped my systems down to 15Mbit/s with no explanation. They also would not bump it back up. I have moved over to try another provider to see how they go called Direct Space who has KVM SSD options. Their speed is not quite the same and they say it’s a fair share access port. They also have a vCloud option that does not list the fair share use on the port I may test out as well.
Ultimate Plex VPS Step 2: Choosing a Linux Distro
I have these both on Ubuntu and CentOS. What I found I also liked about all providers is that they offer an ISO library that not only included both, but specifically CentOS 7 Minimal which I am personally a fan of to keep the installation as light as possible. You can elect to spin up and install from the ISO yourself and that is what I did and the rest of this post will cover the steps to configure the PLEX VPS under CentOS 7 Minimal.
Configuring Plex VPS Step 1: Install Dependencies
Based on the fact this is a minimal installation there is some packages you will want/need for some basic toolsets. I will get into some of these later, but here is the list I compiled as I went through the installs.
#Install Core Packages
yum install -y python nano wget sudo zip git unzip fuse net-tools firewalld

#Install EPEL Repo
yum install epel-release -y

#Install ncdu from EPEL (Useful for finding large files)
yum -y install ncdu

#Install PIP from EPEL
yum -y install python-pip
pip install --upgrade pip

#Install Speedtest-CLI
pip install speedtest-cli

#Install OpenSSL for PlexPY
pip install pyopenssl
Next you will want to add a new user for plex and add it to the wheel group
adduser plex
usermod -aG wheel plex
Configuring Plex VPS Step 2: Configure FirewallD
Most VPS installs I have found vary in what is allowed in the internal firewall. CentOS now uses firewalld instead of iptables so here is the restricted settings I found worked well. Port 8181 will be used later for the Tautulli application (Old PlexPY)
systemctl enable firewalld
systemctl start firewalld
firewall-cmd --zone=public --add-port=32400/tcp --permanent
firewall-cmd --zone=public --add-port=8181/tcp --permanent
firewall-cmd --zone=public --add-icmp-block=echo-reply --permanent
firewall-cmd --zone=public --add-icmp-block={echo-request,echo-reply,timestamp-reply,timestamp-request} --permanent
firewall-cmd --reload
Configuring Plex VPS Step 3: Install and Configure PlexDrive
There are a number of ways to connect to Google Drive using fuse, but the easiest I have found is what id called PlexDrive. It’s pretty well documented and easy to install. For the purposes of this installation I will give you the required steps. Before you can do this you do need to enable the Google Drive API. In the computer with the web browser, create an OAuth2 application and credentials. The following steps are what I did, based on my notes:
- Sign in to your Google account and create a project: https://console.cloud.google.com/
- Click “API Manager” then “Library” in the left-hand pane (will take you to https://console.cloud.google.com/apis/library). Click on “Drive API”, then “ENABLE API”.
- Click “Credentials” in the left hand pane, then click on the button “Create Credentials” (OAuth client ID)
- Choose “Other”
- Choose any product name, e.g “PlexDrive”
- Click “Create”. You will get a Client ID, a Client Secret
cd ~
wget https://github.com/dweidenfeld/plexdrive/releases/download/5.0.0/plexdrive-linux-amd64
mv plexdrive-linux-amd64 plexdrive
mv plexdrive /usr/bin/
cd /usr/bin/
sudo chown root:root /usr/bin/plexdrive
sudo chmod 755 /usr/bin/plexdrive
mkdir /mnt/gdrive

#Run manually to setup connections to follow the prompts
plexdrive mount -c /root/.plexdrive -o allow_other /mnt/gdrive

#Once the credentials are saved you can CTL ^C out
Next you will want to create this as a service
nano /lib/systemd/system/plexdrive.service

#Edit the file and insert the following
[Unit]
Description=Plexdrive
AssertPathIsDirectory=/mnt/gdrive
After=network-online.target

[Service]
Type=simple
ExecStart=/usr/bin/plexdrive -o allow_other -v 2 --max-chunks=50 mount /mnt/gdrive/
ExecStop=/bin/fusermount -uz /mnt/gdrive
Restart=on-abort

[Install]
WantedBy=default.target

#Enable and start service
systemctl daemon-reload
systemctl start plexdrive.service
systemctl enable plexdrive.service
Configuring Plex VPS Step 4: Install and Configure PLEX
There is an interesting note that the PLEX installation does add a repo for updates, but you do need to install manually first then update the repo the installer creates so you can easily update later without the manual hassle. This is pretty straight forward, but the trick is connecting to it to set it up.
#Install from RPM then update repo
su plex
cd ~
wget [download-link]
sudo yum install plexmediaserver-xxx-Latest.rpm

#Edit the Repo
nano /etc/yum.repos.d/plex.repo

#change line 4 from enabled=0 to enabled=1. It should look like this:
[PlexRepo]
name=PlexRepo
baseurl=https://downloads.plex.tv/repo/rpm/$basearch/
enabled=1
gpgkey=https://downloads.plex.tv/plex-keys/PlexSign.key
gpgcheck=1
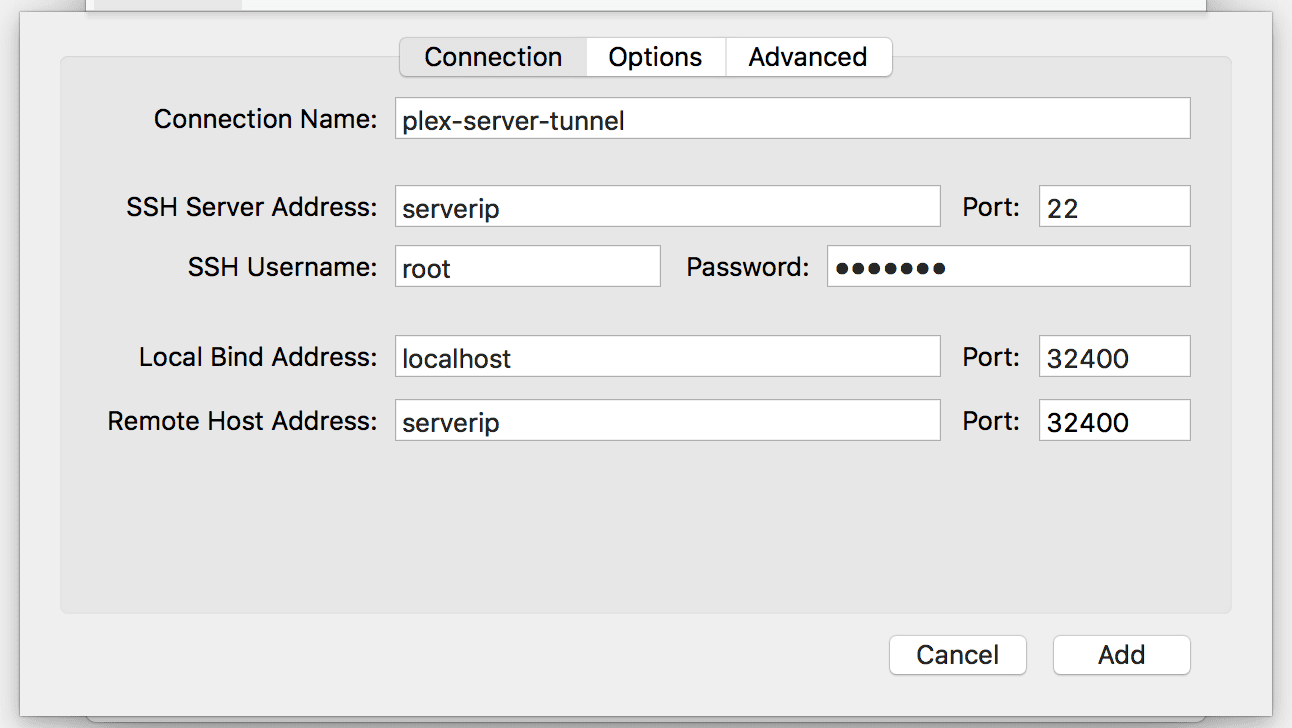
In order to access the server to add it to your account you will need to create a secure connection for access via localhost. Since this is a remote server you need to create the connection. I use a mac and found that the application Secure Pipes is the easiest way. Below is the configuration you will need to access http://localhost:32400/web
Once you complete the setup to your existing account you can disconnect Secure Pipes and finish the setup from the regular PLEX.tv page and the new server should be connected. You will need to enable remote access of course but if you setup the firewall settings above it should connect just fine. At this point depending on the time it takes for PlexDrive to cache your Google Drive, you can then add libraries and access them in by browsing to /mnt/gdrive/[DIRECTORY]. At that point the PLEX server will start building the library. You can also migrate library meta data using the process already documented by PLEX which take a little more work.
Configuring Plex VPS Step 5: Install and Configure Tautulli (PlexPY)
This is an extra step but well worth it if you want to be able to see more detail on the streams happening and also see some analytics data and even get alerts via notifications. I use this a lot to troubleshoot or get notified about upgrades as well. You can find out more from the Tautulli Page here. The setup is pretty easy though.
#Add User for Service
adduser --system --no-create-home tautulli

#Install From Git
cd /opt
git clone https://github.com/Tautulli/Tautulli.git
chown tautulli:nobody -R /opt/Tautulli
cp /opt/Tautulli/init-scripts/init.systemd /lib/systemd/system/tautulli.service

#Edit the GROUP to "nobody"  Other docs say nogroup which is not in CentOS
nano /lib/systemd/system/tautulli.service

#######
[Unit]
Description=Tautulli - Stats for Plex Media Server usage

[Service]
ExecStart=/opt/Tautulli/Tautulli.py --quiet --daemon --nolaunch --config /opt/Tautulli/config.ini --datadir /opt/Tautulli
GuessMainPID=no
Type=forking
User=tautulli
Group=nobody

[Install]
WantedBy=multi-user.target
#######

systemctl daemon-reload
systemctl enable tautulli.service
systemctl start tautulli.service
You can now point a browser to http://SERVERIP:8181 and you will see the setup screen for the application and you can go from there with the well documented information.